| Company | Contact | Country |
|---|---|---|
| www | www | www |
| Centro comercial Moctezuma | Francisco Chang | Mexico |
| Ernst Handel | Roland Mendel | Austria |
| Island Trading | Helen Bennett | UK |
| Laughing Bacchus Winecellars | Yoshi Tannamuri | Canada |
| Magazzini Alimentari Riuniti | Giovanni Rovelli | Italy |
Thursday, September 5, 2019
TEST


Wednesday, July 13, 2011
Rporting Service and Sharepoint...simple solution to a colossal problem
Working with Sharepoint and Reporting Service is not something someone is going to enjoy. I can make a list of troubles you will face but that may scare you enough to make different plans for your career(as it did for me), so I am not being a wailer here. Rather I would talk about a common problem, discuss the weird things came into my mind and guide you to a elegant solution that caused me almost 2 days.
At the beginning of the day the requirement is very simple. You have to make a SSRS report which takes 5 parameters and load the report. It's so easy man, you can do it. So you make a report and upload it to reporting service server. And in Sharepoint you do the following
1. Add a Report Viewer web part to your page. By default this web part is not available, so to use this web part copy RSWebParts.cab from C:\Program Files (x86)\Microsoft SQL Server\100\Tools\Reporting Services\SharePoint\ RSWebParts.cab
Then run the following command
STSADM.EXE -o addwppack -filename "RSWebParts.cab" -globalinstall
2. Change the report viewer web part's report server and report path value in edit mode.
So you are done with adding the report to Sharepoint. The client will change the parameter values form the parameter panel of the report and view the report.
Now as the noon comes the requirements get changed. The client does not like the ugly parameter panel anymore and they want some better looking controls for selecting parameter values. So what you have to do is make a custom parameter panel. What I could come up with is a custom Filter web part. My plan was
1. Make a filter web part which will have some server controls(one control per parameter).
2. Connect the report viewer web part to the filter web part using connection. The report viewer web part can take parameter values from connections and get refreshed with the new parameter values.
As I have not mentioned all detail about how to do this, by the time you have done this you will be thanking Google and may be cursing Microsoft!
Your client is still not happy(as they are never). To make your life hell now they want different reports to be displayed in the same place depending on a drop down or button(you are dead!). Moreover they again wants to change the parameter panel. For example they have added a Javascript tree and some other html controls from which you have to take the parameter values.
The first problem with the new requirements is multiple reports in the same report viewer control. Report viewer controls can take both report path and report parameter values using connections. But they can not take them both at the same time. As the custom Filter web part is providing the parameter values the report viewer control can not take report pathusing connection.
The second problem is your HTML controls.How the filter web part is going to provide values taking form a non server control?
After couple of frustrating hours(smoke,tea,coffee and career change plans...) I came up with the following ideas.
1. The parameter panel will be now in HTML and JS. There will be a "Show Report" HTML button.
2. There will be an Iframe in the page.
3. There will be an aspx page stored in sharpeoint which will have a report viewer control(read again, it is not report viewer web part!). The page in its page load will parse it's Query string and find the report name and parameters required. It will then set the report viewer's report path and parameters.
4. When the "Show Report" button is clicked it will set the iframe's source too the aspx page and pass the parameters as Query string.
So this way if you are lucky enough you can make it work. But there is a very good chance of getting stuck at some point. Luckily while struggling with these issues I found something totally unexpected.
The reporting service server manager URL actuallly has an aspx page. And the well kept secret is this page takes query string parameters and load the reports accordingly. So you only pass the report name and parameters as querystring and set the url as source of your iframe. And voila! your report is shown out of no where :) So finally I came up with the following javascript code.
At the beginning of the day the requirement is very simple. You have to make a SSRS report which takes 5 parameters and load the report. It's so easy man, you can do it. So you make a report and upload it to reporting service server. And in Sharepoint you do the following
1. Add a Report Viewer web part to your page. By default this web part is not available, so to use this web part copy RSWebParts.cab from C:\Program Files (x86)\Microsoft SQL Server\100\Tools\Reporting Services\SharePoint\ RSWebParts.cab
Then run the following command
STSADM.EXE -o addwppack -filename "RSWebParts.cab" -globalinstall
2. Change the report viewer web part's report server and report path value in edit mode.
So you are done with adding the report to Sharepoint. The client will change the parameter values form the parameter panel of the report and view the report.
Now as the noon comes the requirements get changed. The client does not like the ugly parameter panel anymore and they want some better looking controls for selecting parameter values. So what you have to do is make a custom parameter panel. What I could come up with is a custom Filter web part. My plan was
1. Make a filter web part which will have some server controls(one control per parameter).
2. Connect the report viewer web part to the filter web part using connection. The report viewer web part can take parameter values from connections and get refreshed with the new parameter values.
As I have not mentioned all detail about how to do this, by the time you have done this you will be thanking Google and may be cursing Microsoft!
Your client is still not happy(as they are never). To make your life hell now they want different reports to be displayed in the same place depending on a drop down or button(you are dead!). Moreover they again wants to change the parameter panel. For example they have added a Javascript tree and some other html controls from which you have to take the parameter values.
The first problem with the new requirements is multiple reports in the same report viewer control. Report viewer controls can take both report path and report parameter values using connections. But they can not take them both at the same time. As the custom Filter web part is providing the parameter values the report viewer control can not take report pathusing connection.
The second problem is your HTML controls.How the filter web part is going to provide values taking form a non server control?
After couple of frustrating hours(smoke,tea,coffee and career change plans...) I came up with the following ideas.
1. The parameter panel will be now in HTML and JS. There will be a "Show Report" HTML button.
2. There will be an Iframe in the page.
3. There will be an aspx page stored in sharpeoint which will have a report viewer control(read again, it is not report viewer web part!). The page in its page load will parse it's Query string and find the report name and parameters required. It will then set the report viewer's report path and parameters.
4. When the "Show Report" button is clicked it will set the iframe's source too the aspx page and pass the parameters as Query string.
So this way if you are lucky enough you can make it work. But there is a very good chance of getting stuck at some point. Luckily while struggling with these issues I found something totally unexpected.
The reporting service server manager URL actuallly has an aspx page. And the well kept secret is this page takes query string parameters and load the reports accordingly. So you only pass the report name and parameters as querystring and set the url as source of your iframe. And voila! your report is shown out of no where :) So finally I came up with the following javascript code.
Monday, June 20, 2011
Few important power shell commands
Before trying any of the following commands in powershell make sure that service SharePoint 2010 Administrationis started. if it is not started then start it.
Go to Start -> All Programmers -> Microsoft SharePoint 2010 Products -> SharePoint 2010 Management Shell
To install a solution we use the Add-SPSolution command. If you are using a Sandboxed solution you would use Add-SPUserSolution instead. But for Sandbox solution I would prefer adding the wsp file using GUI in Central Admin.
PS C:\Users\user1> Add-SPSolution C:\mySolution.wsp
Now to deploy the solution to your Sharepoint site we shall use Install-SPSolution
PS C:\Users\user1> Install-SPSolution -Identity mySolution.wsp -WebApplication https://mySiteURL –GACDeployment
To upgrade solution use Update-SPSolution
PS C:\Users\user1>Update-SPSolution –Identity mySolution.wsp –LiteralPath C:\mySolution.wsp –GACDeployment
To retract a solution we use the Uninstall-SPSolution
PS C:\Users\user1>Uninstall-SPSolution –Identity mySolution.wsp –WebApplication https://mySiteURL
And to remove it from solution store use Remove-SPSolution
PS C:\Users\user1>Remove-SPSolution –Identity mySolution.wsp
Few little troubleshooting.
1. You may sometime see the following error when trying Install-SPSolution
Install-SPSolution : This solution contains no resources scoped for a Web appli
cation and cannot be deployed to a particular Web application.
Then try this instead
PS C:\Users\user1> Install-SPSolution -Identity mySolution.wsp –GACDeployment
2. If any of your deploy command fails you will not be able to deploy it again. If you try again you will see the following error
A deployment or retraction is already under way for the so
lution "yourSolution", and only one deployment or retraction at a time is supported.....
To handle this issue open central admin. Go to Monitoring->Review Timer Job Definitions
Then find the job which has you solution name in title. Delete it.
3. You may see the following error if SharePoint 2010 Administration service is not started.
Install-SPSolution: Admin SVC must be running in order to create deployment timer job
So all you need to do is to go to the Services section in Control Panel\System and Security\Administrative Tools and look for the service called SharePoint 2010 Administration, it was on manual start up, changed it to automatic and started it and gotten rid of this error.
Go to Start -> All Programmers -> Microsoft SharePoint 2010 Products -> SharePoint 2010 Management Shell
To install a solution we use the Add-SPSolution command. If you are using a Sandboxed solution you would use Add-SPUserSolution instead. But for Sandbox solution I would prefer adding the wsp file using GUI in Central Admin.
PS C:\Users\user1> Add-SPSolution C:\mySolution.wsp
Now to deploy the solution to your Sharepoint site we shall use Install-SPSolution
PS C:\Users\user1> Install-SPSolution -Identity mySolution.wsp -WebApplication https://mySiteURL –GACDeployment
To upgrade solution use Update-SPSolution
PS C:\Users\user1>Update-SPSolution –Identity mySolution.wsp –LiteralPath C:\mySolution.wsp –GACDeployment
To retract a solution we use the Uninstall-SPSolution
PS C:\Users\user1>Uninstall-SPSolution –Identity mySolution.wsp –WebApplication https://mySiteURL
And to remove it from solution store use Remove-SPSolution
PS C:\Users\user1>Remove-SPSolution –Identity mySolution.wsp
Few little troubleshooting.
1. You may sometime see the following error when trying Install-SPSolution
Install-SPSolution : This solution contains no resources scoped for a Web appli
cation and cannot be deployed to a particular Web application.
Then try this instead
PS C:\Users\user1> Install-SPSolution -Identity mySolution.wsp –GACDeployment
2. If any of your deploy command fails you will not be able to deploy it again. If you try again you will see the following error
A deployment or retraction is already under way for the so
lution "yourSolution", and only one deployment or retraction at a time is supported.....
To handle this issue open central admin. Go to Monitoring->Review Timer Job Definitions
Then find the job which has you solution name in title. Delete it.
3. You may see the following error if SharePoint 2010 Administration service is not started.
Install-SPSolution: Admin SVC must be running in order to create deployment timer job
So all you need to do is to go to the Services section in Control Panel\System and Security\Administrative Tools and look for the service called SharePoint 2010 Administration, it was on manual start up, changed it to automatic and started it and gotten rid of this error.
Tuesday, April 26, 2011
Different types of application with Sharepoint Object Model
SharePoint object model is a .NET-based API to SharePoint components. Or in simpler language you can say SP OM is a way to access Sharepoint components from your custom application(console,web etc.).
Thought I don't encourage anyone to use it over Sharepoint web services but there may be situations where you will have to use it. Sharepoint web services are the best way to deal with any sort of Sharepoint issues from outside of Sharepoint. And before using SP OM keep it in mind that The object model can be used when the application will run on the server where SharePoint is installed or in assemblies that are run within a site (such as a Web Part).
Here I am showing how to use SP OM in two types of application, Console and Web.
First console.
1. Create a console application and add reference to Microsoft.Sharepoint to your project. In case of SP2010 you will find it in "C:\Program Files\Common Files\Microsoft Shared\Web Server Extensions\14\ISAPI\Microsoft.SharePoint.dll" and in case of SP2007 you will find it in "C:\Program Files\Common Files\Microsoft Shared\Web Server Extensions\12\ISAPI\Microsoft.SharePoint.dll"
2. Add the following code to your project.
2. Now go to the "Properties" window of the project and select "Application" tab. Change the "Target Framework" to ".NET Framework 3.5". Now go to "Build" tab and change the "Platform Target" to "x64".
Now run your application. You should see something like "Currently logged in as: SHAREPOINT\system".
For Web appliaction.
1. Create a ASP.NET web site and add the following code in your .aspx page's code behind. Add Microsoft.Sharepoint like before.
As you can guess I have created a Label "Label1" in my page.
2. Create a web site in IIS. Now here is a small trick. While creating the site do not create a new application pool for your site, rather use the application pool of your Sharepoint site.
3. Now deploy your site to your IIS site.
Now if you browse the site you should see something like "Currently logged in as: SHAREPOINT\system".
After doing all these you still may have issues with Object Model. One popular but unauthenticated suggestion is to run all your application in "Administrator" mode. If still you have issues then beg help from Allah!
Thought I don't encourage anyone to use it over Sharepoint web services but there may be situations where you will have to use it. Sharepoint web services are the best way to deal with any sort of Sharepoint issues from outside of Sharepoint. And before using SP OM keep it in mind that The object model can be used when the application will run on the server where SharePoint is installed or in assemblies that are run within a site (such as a Web Part).
Here I am showing how to use SP OM in two types of application, Console and Web.
First console.
1. Create a console application and add reference to Microsoft.Sharepoint to your project. In case of SP2010 you will find it in "C:\Program Files\Common Files\Microsoft Shared\Web Server Extensions\14\ISAPI\Microsoft.SharePoint.dll" and in case of SP2007 you will find it in "C:\Program Files\Common Files\Microsoft Shared\Web Server Extensions\12\ISAPI\Microsoft.SharePoint.dll"
2. Add the following code to your project.
using System;
using System.Collections.Generic;
using System.Linq;
using System.Text;
using Microsoft.SharePoint;

namespace test
{
    class Program
    {
        static void Main(string[] args)
        {
            string siteStr = "<SP Site URL>";
            SPSite tempSite = new SPSite(siteStr);
            SPUserToken systoken = tempSite.SystemAccount.UserToken;
            using (SPSite site = new SPSite(siteStr, systoken))
            {
                using (SPWeb web = site.OpenWeb())
                {
                    //right now, logged in as Site System Account
                    Console.WriteLine("Currently logged in as: " + web.CurrentUser.ToString());
                    Console.Read();
                }
            }
        }
    }
}
2. Now go to the "Properties" window of the project and select "Application" tab. Change the "Target Framework" to ".NET Framework 3.5". Now go to "Build" tab and change the "Platform Target" to "x64".
Now run your application. You should see something like "Currently logged in as: SHAREPOINT\system".
For Web appliaction.
1. Create a ASP.NET web site and add the following code in your .aspx page's code behind. Add Microsoft.Sharepoint like before.
using System;
using System.Collections.Generic;
using System.Linq;
using System.Web;
using System.Web.UI;
using System.Web.UI.WebControls;
using Microsoft.SharePoint;

public partial class _Default : System.Web.UI.Page
{
    protected void Page_Load(object sender, EventArgs e)
    {
        string siteStr = "http://dacsvm0021/my/personal/SSO/";
        SPSite tempSite = null;
        SPSecurity.RunWithElevatedPrivileges(delegate(){
            tempSite = new SPSite(siteStr);
        });

        SPUserToken systoken = tempSite.SystemAccount.UserToken;
        using (SPSite site = new SPSite(siteStr, systoken))
        {
            using (SPWeb web = site.OpenWeb())
            {
                Label1.Text = "Currently logged in as: "+web.CurrentUser.ToString();
            }
        }

    }
}
As you can guess I have created a Label "Label1" in my page.
2. Create a web site in IIS. Now here is a small trick. While creating the site do not create a new application pool for your site, rather use the application pool of your Sharepoint site.
3. Now deploy your site to your IIS site.
Now if you browse the site you should see something like "Currently logged in as: SHAREPOINT\system".
After doing all these you still may have issues with Object Model. One popular but unauthenticated suggestion is to run all your application in "Administrator" mode. If still you have issues then beg help from Allah!
Saturday, February 26, 2011
Install Sharepoint 2010 in Windows 7
If you google with the title of this post you will see many people struggling with this and everyone with their own solution. Unfortunately none of the solutions worked for me. Here I am describing the steps I followed to do this.
Step 1. As you start your installation you will soon see the following error. Pretty disheartening :(
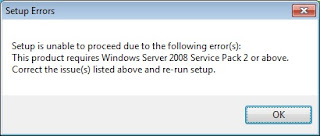
Now to handle this issue open the config.xml file from "\Files\Setup" folder. Add the following line in the <Configuration> section of this file.
Now your installation will proceed. Except this modification installation will not start in Windows 7.
Step 2. Now as your installation go on you will see the ‘non-supported for production’ notice:
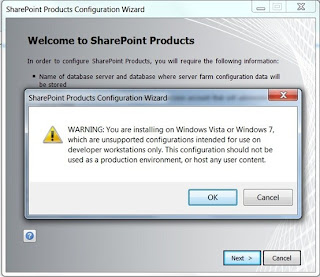
I hope I don't have to explain why this message is prompted. No one should try a production in Windows 7 fro sharepoint.
Step 3. Now you installation will be finished smoothly. But you may face the next hurdle during SharePoint Products Configuration Wizard. If "Windows identity foundation pack" is missing in your machine you will see the following error
Could not load file or assembly 'Microsoft.IdentityModel, Version=3.5.0.0, Culture=neutral, PublicKeyToken=31bf3856ad364e35' or one of its dependencies. The system cannot find the file specified.System.IO.FileNotFoundException: Could not load file or assembly 'Microsoft.IdentityModel, Version=3.5.0.0, Culture=neutral, PublicKeyToken=31bf3856ad364e35' or one of its dependencies. The system cannot find the file specified.
To resolve this download the pack from http://www.microsoft.com/downloads/details.aspx?FamilyID=eb9c345f-e830-40b8-a5fe-ae7a864c4d76&displaylang=en and install it in your Windows 7 machine.
Step 4. If "Chart Control" is missing in your windows 7 machine then you will get the following error.
An exception of type Microsoft.SharePoint.Upgrade.SPUpgradeException was thrown. Additional exception information: Failed to call GetTypes on assembly Microsoft.Office.Server.Search, Version=14.0.0.0, Culture=neutral, PublicKeyToken=71e9bce111e9429c. Could not load file or assembly 'System.Web.DataVisualization, Version=3.5.0.0, Culture=neutral, PublicKeyToken=31bf3856ad364e35' or one of its dependencies. The system cannot find the file specified.
To resolve this issue download it from http://go.microsoft.com/fwlink/?LinkID=122517 and install it.
Ok, all these should be enough. If you still are fighting with this please drop a comment, I shall try to answer with the solution.
Step 1. As you start your installation you will soon see the following error. Pretty disheartening :(

Now to handle this issue open the config.xml file from "\Files\Setup" folder. Add the following line in the <Configuration> section of this file.
<Setting Id="AllowWindowsClientInstall" Value="True"/>
Now your installation will proceed. Except this modification installation will not start in Windows 7.
Step 2. Now as your installation go on you will see the ‘non-supported for production’ notice:

I hope I don't have to explain why this message is prompted. No one should try a production in Windows 7 fro sharepoint.
Step 3. Now you installation will be finished smoothly. But you may face the next hurdle during SharePoint Products Configuration Wizard. If "Windows identity foundation pack" is missing in your machine you will see the following error
Could not load file or assembly 'Microsoft.IdentityModel, Version=3.5.0.0, Culture=neutral, PublicKeyToken=31bf3856ad364e35' or one of its dependencies. The system cannot find the file specified.System.IO.FileNotFoundException: Could not load file or assembly 'Microsoft.IdentityModel, Version=3.5.0.0, Culture=neutral, PublicKeyToken=31bf3856ad364e35' or one of its dependencies. The system cannot find the file specified.
To resolve this download the pack from http://www.microsoft.com/downloads/details.aspx?FamilyID=eb9c345f-e830-40b8-a5fe-ae7a864c4d76&displaylang=en and install it in your Windows 7 machine.
Step 4. If "Chart Control" is missing in your windows 7 machine then you will get the following error.
An exception of type Microsoft.SharePoint.Upgrade.SPUpgradeException was thrown. Additional exception information: Failed to call GetTypes on assembly Microsoft.Office.Server.Search, Version=14.0.0.0, Culture=neutral, PublicKeyToken=71e9bce111e9429c. Could not load file or assembly 'System.Web.DataVisualization, Version=3.5.0.0, Culture=neutral, PublicKeyToken=31bf3856ad364e35' or one of its dependencies. The system cannot find the file specified.
To resolve this issue download it from http://go.microsoft.com/fwlink/?LinkID=122517 and install it.
Ok, all these should be enough. If you still are fighting with this please drop a comment, I shall try to answer with the solution.
Sunday, March 14, 2010
Custom Web Service in MOSS 2007
It was a bad time for me when I was trying to run custom web service in Sharepoint. I was trying and trying and getting weird situations again and again. Anyway,finally it was done and I want to share it with others to save some of their time.
Step 1. Create an ASP.NET Web Service Application in VS 2008. Rename your Service1.asmx file and class name according to your desired name both in .cs file and in markup file.
Step 4. Create a strong name for the dll of your project. In Solution Explorer, right-click the web service project, and in the Properties dialog box, click Signing, select Sign the assembly, and select in the box and create a new strong name key file. Now build the project.
Step 5. Copy the .asmx file to C:\Inetpub\wwwroot. Open the file and delete this portion -
Go to GAC, right click on your assembly and copy the publick key from properties. Your final markup looks like this.
Step 6. Now you have to create .disco and .wsdl files and modify them. There are two ways to do this - creating and modifying manually or using some tool. I prefer the second way but both are explained here.
First Method -
>Run the command in cmd -
set path=%path%;"C:\Program Files\Microsoft Visual Studio 8\SDK\v2.0\Bin";.
> Now run this command in cmd -
Disco http://localhost/YourService.asmx
YourService.disco and YourService.wsdl files will be created.
>To register namespaces of the Windows SharePoint Services object model, open both the .disco and .wsdl files and replace the opening XML processing instruction -- -- with instructions such as the following:
>In the .disco file, modify the contract reference and SOAP address tags to be like the following example, which replaces literal paths with code generated paths through use of the Microsoft.SharePoint.Utilities.SPEncode class, and which replaces the method name that is specified in the binding attribute:
> In the .wsdl file, make the following, similar substitution for the SOAP address that is specified:
>Make the following substitution for the SOAP12 address:
> Rename both files in the respective formats YourServicedisco.aspx and YourServicewsdl.aspx so that your service is discoverable through SharePoint.
Second Method -
>Go to the link http://www.codeproject.com/KB/XML/wss_web_service_helper.aspx and download the tool.
Step 1. Create an ASP.NET Web Service Application in VS 2008. Rename your Service1.asmx file and class name according to your desired name both in .cs file and in markup file.
There are no step 2 and 3, go to step 4 :)
Step 4. Create a strong name for the dll of your project. In Solution Explorer, right-click the web service project, and in the Properties dialog box, click Signing, select Sign the assembly, and select in the box and create a new strong name key file. Now build the project.
Step 5. Copy the .asmx file to C:\Inetpub\wwwroot. Open the file and delete this portion -
CodeBehind="YourService.asmx.cs"
Go to GAC, right click on your assembly and copy the publick key from properties. Your final markup looks like this.
<%@ WebService Language="C#" Class="YourService.YourService, YourService, Version=1.0.0.0, Culture=neutral, PublicKeyToken=615f0967ce2cd86a" %>
Step 6. Now you have to create .disco and .wsdl files and modify them. There are two ways to do this - creating and modifying manually or using some tool. I prefer the second way but both are explained here.
First Method -
>Run the command in cmd -
set path=%path%;"C:\Program Files\Microsoft Visual Studio 8\SDK\v2.0\Bin";.
> Now run this command in cmd -
Disco http://localhost/YourService.asmx
YourService.disco and YourService.wsdl files will be created.
>To register namespaces of the Windows SharePoint Services object model, open both the .disco and .wsdl files and replace the opening XML processing instruction -- -- with instructions such as the following:
<%@ Page Language="C#" Inherits="System.Web.UI.Page"%><%@ Assembly Name="Microsoft.SharePoint, Version=12.0.0.0,Culture=neutral, PublicKeyToken=71e9bce111e9429c" %> <%@ Import Namespace="Microsoft.SharePoint.Utilities" %> <%@ Import Namespace="Microsoft.SharePoint" %><% Response.ContentType = "text/xml"; %>
>In the .disco file, modify the contract reference and SOAP address tags to be like the following example, which replaces literal paths with code generated paths through use of the Microsoft.SharePoint.Utilities.SPEncode class, and which replaces the method name that is specified in the binding attribute:
<contractref ref="<%" wsdl="" output="" docref="<%" xmlns="http://schemas.xmlsoap.org/disco/scl/"><soap address="<%" q1="http://tempuri.org" binding="q1:FilesSoap" xmlns="http://schemas.xmlsoap.org/disco/soap/"><soap address="<%" q2="http://tempuri.org" binding="q2:FilesSoap12" xmlns="http://schemas.xmlsoap.org/disco/soap/">
> In the .wsdl file, make the following, similar substitution for the SOAP address that is specified:
<soap:address location="<%">
>Make the following substitution for the SOAP12 address:
<soap12:address location="<%">
> Rename both files in the respective formats YourServicedisco.aspx and YourServicewsdl.aspx so that your service is discoverable through SharePoint.
Second Method -
>Go to the link http://www.codeproject.com/KB/XML/wss_web_service_helper.aspx and download the tool.
>Use the tool to create YourServicedisco.aspx and YourServicewsdl.aspx files.
Step 7. Now you copy YourServicedisco.aspx,YourServicewsdl.aspx and YourService.asmx files to _vti_bin virtual directory which maps physically to the C:\Program Files\Common Files\Microsoft Shared\Web Server Extensions\12\ISAPI directory, which contains the default Web service files used in Windows SharePoint Services.
Step 8. To make your Web service discoverable in Visual Studio as a Web service alongside the default Windows SharePoint Services Web services, open the spdisco.aspx file located in C:\Program Files\Common Files\Microsoft Shared\Web Server Extensions\12\ISAPI and add the following code, specifying the .asmx file for your Web service.
Step 9. Now go to the link http://yoursite:port_number/_vti_bin/yourservice.asmx. You will see the functions of web service listed in the page.
Step 10. Click a function to see it's Soap. You have to use this soap to call the web service method and retrieve it's returned value.
Here I am giving a jquery example of calling and displaying the data using the soap.
Soap Request
Soap Response
Just create a Content Editor web part and paste this code to call the Web Service.
Ok,this is all about creating and hosting custom web service in MOSS 2007
Step 7. Now you copy YourServicedisco.aspx,YourServicewsdl.aspx and YourService.asmx files to _vti_bin virtual directory which maps physically to the C:\Program Files\Common Files\Microsoft Shared\Web Server Extensions\12\ISAPI directory, which contains the default Web service files used in Windows SharePoint Services.
Step 8. To make your Web service discoverable in Visual Studio as a Web service alongside the default Windows SharePoint Services Web services, open the spdisco.aspx file located in C:\Program Files\Common Files\Microsoft Shared\Web Server Extensions\12\ISAPI and add the following code, specifying the .asmx file for your Web service.
<contractRef ref=<% SPHttpUtility.AddQuote(SPHttpUtility.HtmlEncode(spWeb.Url + "/_vti_bin/YourService.asmx?wsdl"), Response.Output); %>

docRef=<% SPHttpUtility.AddQuote(SPHttpUtility.HtmlEncode(spWeb.Url + "/_vti_bin/YourService.asmx"), Response.Output); %>

xmlns=" http://schemas.xmlsoap.org/disco/scl/ " />

<discoveryRef ref=<% SPHttpUtility.AddQuote(SPHttpUtility.HtmlEncode(spWeb.Url + "/_vti_bin/YourService.asmx?disco"),Response.Output); %>

xmlns="http://schemas.xmlsoap.org/disco/" />
Step 9. Now go to the link http://yoursite:port_number/_vti_bin/yourservice.asmx. You will see the functions of web service listed in the page.
Step 10. Click a function to see it's Soap. You have to use this soap to call the web service method and retrieve it's returned value.
Here I am giving a jquery example of calling and displaying the data using the soap.
Soap Request
<soap:Envelope xmlns:xsi="http://www.w3.org/2001/XMLSchema-instance" xmlns:xsd="http://www.w3.org/2001/XMLSchema" xmlns:soap="http://schemas.xmlsoap.org/soap/envelope/">

<soap:Body>

<HelloWorld xmlns="http://tempuri.org/" />

</soap:Body>

</soap:Envelope>
Soap Response
<soap:Envelope xmlns:xsi="http://www.w3.org/2001/XMLSchema-instance" xmlns:xsd="http://www.w3.org/2001/XMLSchema" xmlns:soap="http://schemas.xmlsoap.org/soap/envelope/">

<soap:Body>

<HelloWorldResponse xmlns="http://tempuri.org/">

<HelloWorldResult>string</HelloWorldResult>

</HelloWorldResponse>

</soap:Body>

</soap:Envelope>
Just create a Content Editor web part and paste this code to call the Web Service.
<script type="text/javascript" src="http://jqueryjs.googlecode.com/files/jquery-1.3.2.min.js"></script>

<script type="text/javascript">

function btnClicked(){


var soapEnv =

"<soap:Envelope xmlns:xsi='http://www.w3.org/2001/XMLSchema-instance' xmlns:xsd='http://www.w3.org/2001/XMLSchema' xmlns:soap='http://schemas.xmlsoap.org/soap/envelope/'>\

<soap:Body>\

<NewMethod xmlns='http://tempuri.org/'>\

 <test>"+'Test'+"</test>\

</NewMethod>\

</soap:Body>\

</soap:Envelope>";


   $.ajax({

       url: "_vti_bin/SPWSData.asmx",

       type: "POST",

       dataType: "xml",

       data: soapEnv,

       complete: processResult,

       contentType: "text/xml; charset=\"utf-8\""

   });

}


function processResult(xData, status) {

   alert(status);

   $(xData.responseXML).find("NewMethodResult").each(function()

   {

     var data = $(this).text();

     alert(data);

   });

}

</script>


<input type="button" onclick="btnClicked()" value="Click"/>
Ok,this is all about creating and hosting custom web service in MOSS 2007
Thursday, March 11, 2010
Webpart containing usercontrol in MOSS 2007
Step 1. Create a web application.
Step 2. Create a UserControl in this web application.
Step 3. Add another Project (sharepoint webpart) to this solution.
Step 4. Add the following code to the .cs file of the webpart. This is the minimal code to load a usercontrol in a webpart.
Step 6. Place the .ascx file of the usercontrol in this folder.
Step 7. Open the .ascx file in notepad and delete the followong code "CodeBehind="YourUserControl.ascx.cs"
Step 8. Build the solution and copy the dll of the web application.
Step 9. Put the dll in the bin directory of virtual directory.
Step 10. Right click on the webpart project and see the properties. Here put the link of the sharepoint site in Debug box.
Step 11. Now Right click on the webpart project and click Deploy.
Step 2. Create a UserControl in this web application.
Step 3. Add another Project (sharepoint webpart) to this solution.
Step 4. Add the following code to the .cs file of the webpart. This is the minimal code to load a usercontrol in a webpart.
     Control controlObject;
     String userControlURI = @"~/UserControls/YourUserControl.ascx";
     public FCWebPart()
     {
     }

     protected override void CreateChildControls()
     {
         base.CreateChildControls();

         try
         {
             controlObject = this.Page.LoadControl(userControlURI);
             if (controlObject != null)
             {
                 controlObject.ID = "UCID";
                 Controls.Add(controlObject);
             }
         }
         catch { }
     }

     protected override void Render(HtmlTextWriter writer)
     {
         try
         {
             controlObject.RenderControl(writer);
         }
         catch (Exception e)
         {
             writer.Write(e.Message);
         }
     }
Step 6. Place the .ascx file of the usercontrol in this folder.
Step 7. Open the .ascx file in notepad and delete the followong code "CodeBehind="YourUserControl.ascx.cs"
Step 8. Build the solution and copy the dll of the web application.
Step 9. Put the dll in the bin directory of virtual directory.
Step 10. Right click on the webpart project and see the properties. Here put the link of the sharepoint site in Debug box.
Step 11. Now Right click on the webpart project and click Deploy.
Wednesday, March 10, 2010
Custom Webpart in MOSS 2007
Webparts are Cool, Hot and Flexible. Ok,this was a joke, but webparts are really very helpful to add some customized support to your sharepoint site. I hope you have the basic understanding of what is webpart and how to add/remove a webpart from sharepoint site. Here I will discuss two ways to deploy custom sharepoint site, the first one is messy and the second one is hilarious(not so sure about the adjective!). Read the first one if you want to curse me or skip to the next one.
Prerequisite :
Install an extension for your VS, you will find it in http://www.microsoft.com/downloads/details.aspx?FamilyID=B2C0B628-5CAB-48C1-8CAE-C34C1CCBDC0A&displaylang=en or google with "visual studio extension for sharepoint 1.3" if fail to click/copy the link from here(is not that an impossible case?) This extension is known as VSEWSS.
First Method :
Step 1 : Open VS2008 and try to create a new Project. As you have installed VSEWSS you will find a new category in create project named “SharePoint”. Choose an Empty template.
Step 2 : Now in your blank project add a Web Part through Add -> New Item -> Web Part. A new web part is created in your project. Write your code here according to your need or leave it as it is if you are only learning.
Step 3 : Now right clicking on the project in Solution Explorer you will find a new option, “Package”. Click it and your web part is done :)
Now the next is to deploy it...
Step 4 : Now add "C:\Program Files\Common Files\Microsoft Shared\web server extensions\12\BIN" this to your path variable. Why? I will not tell you.Google for the answer if you don’t know. To make it path variable run this in cmd,
>set path=%path%;"C:\Program Files\Common Files\Microsoft Shared\web server extensions\12\BIN";.
Step 5 : Now in cmd go to Debug folder of your project. You will find a .wsp file in this folder named after your webpart. Now to add your WebPart to your Sahrepoint site run the following command.
>stsadm -o addsolution -filename FirstWebPart.wsp
Step 6 : Now open Sharepoint Central Administration. Go to Central Administration > Operations > Solution Management
If you are not damn unlucky you will find your web part here listed. Click it and Deploy it.
Step 7 : Now go to your sharepoint site. Click Site Actions and go to Site Settings > Site Features
Here you will find your web part,just activate it.
Step 8 : Now go to Site Actions>Edit Page and add you web part in the page.
Wow it’s visible in your page and you are really done with your web part :)
Step 9 : If you like to upgrade your webpart run the command in cmd in Debug folder of your project
>stsadm -o upgradesolution -name FirstWebPart.wsp -filename FirstWebPart.wsp -immediate –allowgacdeployment
Or
Just paste the dll of the solution into GAC and iireset. For this you have to assign strong name to your dll,Google for how to assign strong name to dll.
Second Method :
This is same up to Step 3 of First Method, just the deployment portion is different. So follow up to Step 3 and then
Step 4 : Build the webpart solution and copy the dll of the web application.
Step 5 : Put the dll in the bin direstory of virtual directory of your site.
Step 6 : Right click on the webpart project and see the properties. Here put the link of the sharepoint site in Debug box and put a new key file name Signing box. Build the project.
Step 7 : Now Right click on the webpart project and click Deploy.
Step 8 : Now go to your sharepoint site. Click Site Actions and go to Site Settings > Site Features
Here you will find your web part,just activate it.
Step 9 : Now go to Site Actions>Edit Page and add you web part in the page.
Wow it’s visible in your page and you are really done with your web part :)
Prerequisite :
Install an extension for your VS, you will find it in http://www.microsoft.com/downloads/details.aspx?FamilyID=B2C0B628-5CAB-48C1-8CAE-C34C1CCBDC0A&displaylang=en or google with "visual studio extension for sharepoint 1.3" if fail to click/copy the link from here(is not that an impossible case?) This extension is known as VSEWSS.
First Method :
Step 1 : Open VS2008 and try to create a new Project. As you have installed VSEWSS you will find a new category in create project named “SharePoint”. Choose an Empty template.
Step 2 : Now in your blank project add a Web Part through Add -> New Item -> Web Part. A new web part is created in your project. Write your code here according to your need or leave it as it is if you are only learning.
Step 3 : Now right clicking on the project in Solution Explorer you will find a new option, “Package”. Click it and your web part is done :)
Now the next is to deploy it...
Step 4 : Now add "C:\Program Files\Common Files\Microsoft Shared\web server extensions\12\BIN" this to your path variable. Why? I will not tell you.Google for the answer if you don’t know. To make it path variable run this in cmd,
>set path=%path%;"C:\Program Files\Common Files\Microsoft Shared\web server extensions\12\BIN";.
Step 5 : Now in cmd go to Debug folder of your project. You will find a .wsp file in this folder named after your webpart. Now to add your WebPart to your Sahrepoint site run the following command.
>stsadm -o addsolution -filename FirstWebPart.wsp
Step 6 : Now open Sharepoint Central Administration. Go to Central Administration > Operations > Solution Management
If you are not damn unlucky you will find your web part here listed. Click it and Deploy it.
Step 7 : Now go to your sharepoint site. Click Site Actions and go to Site Settings > Site Features
Here you will find your web part,just activate it.
Step 8 : Now go to Site Actions>Edit Page and add you web part in the page.
Wow it’s visible in your page and you are really done with your web part :)
Step 9 : If you like to upgrade your webpart run the command in cmd in Debug folder of your project
>stsadm -o upgradesolution -name FirstWebPart.wsp -filename FirstWebPart.wsp -immediate –allowgacdeployment
Or
Just paste the dll of the solution into GAC and iireset. For this you have to assign strong name to your dll,Google for how to assign strong name to dll.
Second Method :
This is same up to Step 3 of First Method, just the deployment portion is different. So follow up to Step 3 and then
Step 4 : Build the webpart solution and copy the dll of the web application.
Step 5 : Put the dll in the bin direstory of virtual directory of your site.
Step 6 : Right click on the webpart project and see the properties. Here put the link of the sharepoint site in Debug box and put a new key file name Signing box. Build the project.
Step 7 : Now Right click on the webpart project and click Deploy.
Step 8 : Now go to your sharepoint site. Click Site Actions and go to Site Settings > Site Features
Here you will find your web part,just activate it.
Step 9 : Now go to Site Actions>Edit Page and add you web part in the page.
Wow it’s visible in your page and you are really done with your web part :)
At last found a great way to paste code in Blogger
If you ever have tried to use code in your blogger site you surly have come to know about the syntaxhighlighter project. It's a great tool with lots of features. But I was looking for some more flexible ways to work with and at last found a very handy tool. There is an add-on for almost everything in firefox and so is for this purpose. The Quick paste code to Blogger is really a nice add-on. Link to this add-on is https://addons.mozilla.org/en-US/firefox/addon/11911 Just install it and you will get a button named Code in your blogger New Post page. Just click it and paste your code and select the language :)
Pretty cool, huh?
Pretty cool, huh?
Friday, January 8, 2010
Creating Custom Template in Share Point2007(MOSS 2007)
Follow the steps to create and add a custom template in Sharepoint 2007.
1. Go to C:\Program Files\Common Files\Microsoft Shared\web server extensions\12\TEMPLATE\SiteTemplates and make a copy of any of the folders here. Each folder here means a Template.
2. Rename the copied folder with your desired template name,like TEST. Keep in mind that the name should be in uppercase.
3. Go to C:\Program Files\Common Files\Microsoft Shared\web server extensions\12\TEMPLATE\1033\XML folder and make a copy of any of the Webtemp*.xml file.
4. Rename the copied file to WebtempTEST.xml.
5. Open the WebtempTEST.xml and replace all attributes with TEST. Set DisplayCategory="Custom".
6. Restart IIS.
7. Now create a site collection and choose the created Template there.
1. Go to C:\Program Files\Common Files\Microsoft Shared\web server extensions\12\TEMPLATE\SiteTemplates and make a copy of any of the folders here. Each folder here means a Template.
2. Rename the copied folder with your desired template name,like TEST. Keep in mind that the name should be in uppercase.
3. Go to C:\Program Files\Common Files\Microsoft Shared\web server extensions\12\TEMPLATE\1033\XML folder and make a copy of any of the Webtemp*.xml file.
4. Rename the copied file to WebtempTEST.xml.
5. Open the WebtempTEST.xml and replace all attributes with TEST. Set DisplayCategory="Custom".
6. Restart IIS.
7. Now create a site collection and choose the created Template there.
Creating Custom Masterpage in Share Point2007(MOSS 2007)
I found two ways to create and add a custom masterpage in Share Point 2007(MOSS 2007). They are described below.
First procedure :
1. First go to the folder where masterpages are stored. The path is Local Drive:\Program Files\Common Files\Microsoft Shared\web server extensions\12\TEMPLATE\FEATURES\PublishingLayouts\MasterPages
2. Now you can create a new masterpage using Sharepoint Designer or make a copy of an existing masterpage. Give it a new name like Test.master
3. Go to the following folder Local Drive:\Program Files\Common Files\Microsoft Shared\web server extensions\12\TEMPLATE\FEATURES\PublishingLayouts and open the file named ProvisionedFiles.xml
4. Find the OSGMasterPages Module tag and make a copy of any File tag block within this Module tag block. Here is a File tag block for every master page. Suppose you copied BlackSingleLevel.master block
5. In your copied block replace all BlackSingleLevel with Test.
6. Update the description of your master page in MasterPageDescription block.
7. In the next Module, PublishingLayoutsPreviewImages, create an entry for the preview image by copying and pasting and existing FILE tag and updating the properties,I mean the .png file name.
8. Now restart IIS.
9. Now go to your sharepoint site and go to here Site Actions -> Site Settings -> Site collection features and activate Office SharePoint Server Publishing Infrastructure if not activated.
10. Now go to Site Actions -> Site Settings -> Master Page(under Look and Feel) and you will find two dropdown lists of masterpages. Select yours(Test.master) from here.
11. You are done :)
Second Procedure :
1. Create a Masterpage using Sharepoint Designer or by coping an existing one.
2. Now go to your sharepoint site and go to here Site Actions -> Site Settings -> Site collection features and activate Office SharePoint Server Publishing Infrastructure if not activated.
3. Now go to Site Actions -> Site Settings -> Master Page(under Galleries) and upload your masterpage.
4. Now go to Site Actions -> Site Settings -> Master Page(under Look and Feel) and you will find two dropdown lists of masterpages. Select yours from here.
Second one is easy,hah?
Now remember few things when making your own masterpage. There are some things which must be contained in your masterpage. Go to http://msdn.microsoft.com/en-us/library/aa660698.aspx and check the minimal masterpage. Keep in mind that you have to add all the contentplaceholder of this minimal masterpage in your masterpage.
First procedure :
1. First go to the folder where masterpages are stored. The path is Local Drive:\Program Files\Common Files\Microsoft Shared\web server extensions\12\TEMPLATE\FEATURES\PublishingLayouts\MasterPages
2. Now you can create a new masterpage using Sharepoint Designer or make a copy of an existing masterpage. Give it a new name like Test.master
3. Go to the following folder Local Drive:\Program Files\Common Files\Microsoft Shared\web server extensions\12\TEMPLATE\FEATURES\PublishingLayouts and open the file named ProvisionedFiles.xml
4. Find the OSGMasterPages Module tag and make a copy of any File tag block within this Module tag block. Here is a File tag block for every master page. Suppose you copied BlackSingleLevel.master block
5. In your copied block replace all BlackSingleLevel with Test.
6. Update the description of your master page in MasterPageDescription block.
7. In the next Module, PublishingLayoutsPreviewImages, create an entry for the preview image by copying and pasting and existing FILE tag and updating the properties,I mean the .png file name.
8. Now restart IIS.
9. Now go to your sharepoint site and go to here Site Actions -> Site Settings -> Site collection features and activate Office SharePoint Server Publishing Infrastructure if not activated.
10. Now go to Site Actions -> Site Settings -> Master Page(under Look and Feel) and you will find two dropdown lists of masterpages. Select yours(Test.master) from here.
11. You are done :)
Second Procedure :
1. Create a Masterpage using Sharepoint Designer or by coping an existing one.
2. Now go to your sharepoint site and go to here Site Actions -> Site Settings -> Site collection features and activate Office SharePoint Server Publishing Infrastructure if not activated.
3. Now go to Site Actions -> Site Settings -> Master Page(under Galleries) and upload your masterpage.
4. Now go to Site Actions -> Site Settings -> Master Page(under Look and Feel) and you will find two dropdown lists of masterpages. Select yours from here.
Second one is easy,hah?
Now remember few things when making your own masterpage. There are some things which must be contained in your masterpage. Go to http://msdn.microsoft.com/en-us/library/aa660698.aspx and check the minimal masterpage. Keep in mind that you have to add all the contentplaceholder of this minimal masterpage in your masterpage.
Creating Custom Masterpage in Share Point2007(MOSS 2007)
I found two ways to create and add a custom masterpage in Share Point 2007(MOSS 2007). They are described below.
First procedure :
1. First go to the folder where masterpages are stored. The path is Local Drive:\Program Files\Common Files\Microsoft Shared\web server extensions\12\TEMPLATE\FEATURES\PublishingLayouts\MasterPages
2. Now you can create a new masterpage using Sharepoint Designer or make a copy of an existing masterpage. Give it a new name like Test.master
3. Go to the following folder Local Drive:\Program Files\Common Files\Microsoft Shared\web server extensions\12\TEMPLATE\FEATURES\PublishingLayouts and open the file named ProvisionedFiles.xml
4. Find the OSGMasterPages Module tag and make a copy of any File tag block within this Module tag block. Here is a File tag block for every master page. Suppose you copied BlackSingleLevel.master block
5. In your copied block replace all BlackSingleLevel with Test.
7. In the next Module, PublishingLayoutsPreviewImages, create an entry for the preview image by copying and pasting and existing FILE tag and updating the properties.
8. Now restart IIS.
9. Now go to your sharepoint site and go to here Site Actions -> Site Settings -> Site collection features and activate Office SharePoint Server Publishing Infrastructure if not activated.
10. Now go to Site Actions -> Site Settings -> Master Page(under Look and Feel) and you will find two dropdown lists of masterpages. Select yours(Test.master) from here.
11. You are done :)
Second Procedure :
1. Create a Masterpage using Sharepoint Designer or by coping an existing one.
2. Now go to your sharepoint site and go to here Site Actions -> Site Settings -> Site collection features and activate Office SharePoint Server Publishing Infrastructure if not activated.
3. Now go to Site Actions -> Site Settings -> Master Page(under Galleries) and upload your masterpage.
4. Now go to Site Actions -> Site Settings -> Master Page(under Look and Feel) and you will find two dropdown lists of masterpages. Select yours from here.
Second one is easy,hah?
Now remember few things when making your own masterpage. There are some things which must be contained in your masterpage. Go to http://msdn.microsoft.com/en-us/library/aa660698.aspx and check the minimal masterpage. Keep in mind that you have to add all the contentplaceholder of this minimal masterpage in your masterpage.
First procedure :
1. First go to the folder where masterpages are stored. The path is Local Drive:\Program Files\Common Files\Microsoft Shared\web server extensions\12\TEMPLATE\FEATURES\PublishingLayouts\MasterPages
2. Now you can create a new masterpage using Sharepoint Designer or make a copy of an existing masterpage. Give it a new name like Test.master
3. Go to the following folder Local Drive:\Program Files\Common Files\Microsoft Shared\web server extensions\12\TEMPLATE\FEATURES\PublishingLayouts and open the file named ProvisionedFiles.xml
4. Find the OSGMasterPages Module tag and make a copy of any File tag block within this Module tag block. Here is a File tag block for every master page. Suppose you copied BlackSingleLevel.master block
5. In your copied block replace all BlackSingleLevel with Test.
6. Update the description of your master page in
7. In the next Module, PublishingLayoutsPreviewImages, create an entry for the preview image by copying and pasting and existing FILE tag and updating the properties.
8. Now restart IIS.
9. Now go to your sharepoint site and go to here Site Actions -> Site Settings -> Site collection features and activate Office SharePoint Server Publishing Infrastructure if not activated.
10. Now go to Site Actions -> Site Settings -> Master Page(under Look and Feel) and you will find two dropdown lists of masterpages. Select yours(Test.master) from here.
11. You are done :)
Second Procedure :
1. Create a Masterpage using Sharepoint Designer or by coping an existing one.
2. Now go to your sharepoint site and go to here Site Actions -> Site Settings -> Site collection features and activate Office SharePoint Server Publishing Infrastructure if not activated.
3. Now go to Site Actions -> Site Settings -> Master Page(under Galleries) and upload your masterpage.
4. Now go to Site Actions -> Site Settings -> Master Page(under Look and Feel) and you will find two dropdown lists of masterpages. Select yours from here.
Second one is easy,hah?
Now remember few things when making your own masterpage. There are some things which must be contained in your masterpage. Go to http://msdn.microsoft.com/en-us/library/aa660698.aspx and check the minimal masterpage. Keep in mind that you have to add all the contentplaceholder of this minimal masterpage in your masterpage.
Monday, December 7, 2009
Creating Custom theme in Share Point2007(MOSS 2007)
It is very easy to create custom theme for share point sites. A SharePoint site theme basically consists of three kinds of files:-
1. theme.inf
2. theme.css
3. image files.
Just follow the following steps and you will get your custom theme. Suppose your theme name is "myTheme".
1. Go to the folder "C:Program Files\Common Files\Microsoft Shared\web server extensions\12\TEMPLATE\THEMES" folder. Every Folder under this Folder defines a theme. Just make a copy of any of the the Folders and name it "myTheme". Suppose you copied BELLTOWN folder.
2. Rename BELLTOWN .INF to MYTHEME.INF. Keep in mind the uppercase thing.
3. Open MYTHEME.INF file with notepad and replace all BELLTOWN to myTheme.
4. Open "C:Program Files\Common Files\Microsoft Shared\web server extensions\12\TEMPLATELAYOUTS\1033\SPTHEMES.XML" file with notepad.5. Add the following lines under
<>
<>
<>
<>images/
<>images/
< /templates >
6. Create a picture to describe your theme and store that in "C:Program Files\Common Files\Microsoft Shared\web server extensions\12\TEMPLATE\IMAGES" folder with myTheme.gif name.
7. Restart IIS.
8. Now go to Site Settings, now choose myTheme theme.
9. Now to edit this theme open SharePoint Designer 2007. Go to "File" -> "Open Site…" and type the URL of your site.
10. In the Left menu you will find a lot of Folder,find a folder named myTheme which is your custom theme.
11. Find myTh-65001.css file in this folder. This is the CSS file for your theme. Edit this according to your need.
12. There is another css file named CORE.CSS in "C:Program Files\Common Files\Microsoft Shared\web server extensions\12\TEMPLATE\LAYOUT\1033\STYLES" which contains styles for all sites. You may need to override some css attributes from this file.
Friday, December 4, 2009
Using Membership Provider with security controls in ASP.NET
Membership Provider is a great feature of ASP.NET which makes user authentication jobs dramatically easier for coders. There are two different membership providers: the ActiveDirectoryMembershipProvider and the SqlMembershipProvider.
The ActiveDirectoryMembership provider uses Microsoft® Active Directory® directory service to maintain user information, while the SqlMembershipProvider stores user details in a SQL Server database.
This article is aimed to provide the minimum required steps to use Membership Provider with security controls.
First create a database which will store your user credentials. Suppose the name of the database is Credentials.
First start Visual Studio 2008 Command Prompt,assuming you are using VS2008 you will find it in All Programs>Microsoft Visual Studio 2008>Visual Studio Tools>Visual Studio 2008 Command Prompt.
Now execute the command aspnet_regsql Now you will be given a ASP.NET SQL Server Setup Wizard. You can use this tool to create/configure databases which stores information of ASP.NET application services.
If you have successfully followed the steps then check the database you provided here and you will find some new tables created in your database. So your database is ready.
Now create a web site using VS2008. We have some editing to do in the web.config file. You have to provide connection sttring,changed authentication mode to "Form" from "Windows" and then in system.web section add membership provider info.
<>
< name="ConnectionString" connectionstring="server=BDDH01-W0065\SQL2K5;database=Library;integrated security=SSPI;Trusted_Connection=Yes;">
< /connectionStrings >
and ---
< mode="Form">
and finally in system.web section
< defaultprovider="CustomMembershipProvider">
<>
< add connectionStringName="ConnectionString" name="CustomMembershipProvider"
type="System.Web.Security.SqlMembershipProvider" />
< /providers>
< /membership >
That's all. Now to check if everything is working fine go to Website menu in Visual Studio and select ASP.NET Configuration . A webpage will appear and you can configure your system here Go to Security tab,there will be a option for creating new user. Create a new user.
Now add the Login control in your webpage from Tollbox.Run the website and try to log in using the user you already have created. You can use all the other controls like CreateUserWizard etc. in the same way. Easy, huh :) :) :)
So you have managed to create the whole authentication process without any coding. This is just the beginning,there are a lot of other features available. If possible I will come with some deeper facts.
The ActiveDirectoryMembership provider uses Microsoft® Active Directory® directory service to maintain user information, while the SqlMembershipProvider stores user details in a SQL Server database.
This article is aimed to provide the minimum required steps to use Membership Provider with security controls.
First create a database which will store your user credentials. Suppose the name of the database is Credentials.
First start Visual Studio 2008 Command Prompt,assuming you are using VS2008 you will find it in All Programs>Microsoft Visual Studio 2008>Visual Studio Tools>Visual Studio 2008 Command Prompt.
Now execute the command aspnet_regsql Now you will be given a ASP.NET SQL Server Setup Wizard. You can use this tool to create/configure databases which stores information of ASP.NET application services.
If you have successfully followed the steps then check the database you provided here and you will find some new tables created in your database. So your database is ready.
Now create a web site using VS2008. We have some editing to do in the web.config file. You have to provide connection sttring,changed authentication mode to "Form" from "Windows" and then in system.web section add membership provider info.
<>
< name="ConnectionString" connectionstring="server=BDDH01-W0065\SQL2K5;database=Library;integrated security=SSPI;Trusted_Connection=Yes;">
< /connectionStrings >
and ---
< mode="Form">
and finally in system.web section
< defaultprovider="CustomMembershipProvider">
<>
< add connectionStringName="ConnectionString" name="CustomMembershipProvider"
type="System.Web.Security.SqlMembershipProvider" />
< /providers>
< /membership >
That's all. Now to check if everything is working fine go to Website menu in Visual Studio and select ASP.NET Configuration . A webpage will appear and you can configure your system here Go to Security tab,there will be a option for creating new user. Create a new user.
Now add the Login control in your webpage from Tollbox.Run the website and try to log in using the user you already have created. You can use all the other controls like CreateUserWizard etc. in the same way. Easy, huh :) :) :)
So you have managed to create the whole authentication process without any coding. This is just the beginning,there are a lot of other features available. If possible I will come with some deeper facts.
Friday, November 13, 2009
Microsoft SharePoint : Creating Web Application
Here we shall create a Web Application in Microsoft SharePoint. I assume already IIS and SharePoint has been installed successfully.
First run IIS manager. To do this go to run and type inetmgr. There you will see Web Sites and Application Manager tabs. We shall use these two.
First create a site and publish it. Check if it works in your browser. Change the host file in C:\WINDOWS\system32\drivers\etc folder if needed.
Then create a new Application Pool. Change its' Application Pool Identity from Network Service to Configurable. Use a deticated account for this purpose.
Now Open your SharePoint Central Administration. Here you will find a tab named Application Management. Go to this and click Create new Web Application.
In the new page follow your instinct,I have full faith on your instinct. Change to NTLM from Negotiate in Authentication Provider. Use you already created Web Site and Application Pool to create this Web Application.
Now again go to Application Management and click Create Site Collection. Here create a site collection for the web application you have just created.
It will take smoetime to create the site collection. After it is created you can go to the site using the link provided. Nice site hah ;)
This is just the beginning and simple example. Next article will contain some more interesting things.
First run IIS manager. To do this go to run and type inetmgr. There you will see Web Sites and Application Manager tabs. We shall use these two.
First create a site and publish it. Check if it works in your browser. Change the host file in C:\WINDOWS\system32\drivers\etc folder if needed.
Then create a new Application Pool. Change its' Application Pool Identity from Network Service to Configurable. Use a deticated account for this purpose.
Now Open your SharePoint Central Administration. Here you will find a tab named Application Management. Go to this and click Create new Web Application.
In the new page follow your instinct,I have full faith on your instinct. Change to NTLM from Negotiate in Authentication Provider. Use you already created Web Site and Application Pool to create this Web Application.
Now again go to Application Management and click Create Site Collection. Here create a site collection for the web application you have just created.
It will take smoetime to create the site collection. After it is created you can go to the site using the link provided. Nice site hah ;)
This is just the beginning and simple example. Next article will contain some more interesting things.
Thursday, November 12, 2009
Microsoft SharePoint : Introduction
Ok,first I confess that I am the least learned person about Microsoft SharePoint in the world and so this attempt might be a disastrous one.But I have to learn it anyway and here I will put all the stuffs I get day by day.
So,what is Microsoft SharePoint? This would be a very bad idea asking this question me rather googling it. Google wouldn't mind telling you about this though Microsoft is their biggest competitor. Anyway what idea I got is,this is a collection of tools and s/w. This is not a single s/w rather it's a platform. Now what they are aimed to do? This integrated system can provide content management, enterprise search, accelerate shared business processes blah blah blah...But to me, most importantly it provides developers a platform and tools they need for server administration, application extensibility, and interoperability. Being a Microsoft product it has a very good integration with .NET. So .Net developers might find it interesting to investigate.
Now there are few keywords one must know before going ahead. I will try to list some of them here(be sure that I have copied them all from internet,none of them is written by me :))
wss(windows sharepoint services) : this is a free product from microsoft (comes with windows server). it gives you all the basic functionality of sharepoint including document libraries, lists, even things like email integration.
moss(microsoft office sharepoint server) : this is an add-on to wss which gives some very cool additional features. some examples are excel services, infopath forms server, ecm (enterprise content management) and moss enterprise search. this is not free(Ooops :(:(:(...)
also you can't just install moss... moss is built on top of wss, so wss is a prerequisite.
web application / web app : also known as a virtual server (in sharepoint v2) and an web site / application pool (in iis), web apps allow for logical separation of sharepoint content. each web app runs under a different process on the iis web server.
two examples of different web apps are the central administrator site which runs on an arbitrary port number and then standard sharepoint sites which typically run on port 80. they both run under separate processes in iis.
site collection / top level site / parent site / spsite : a site collection is a web site that can contain sub-sites (aka webs), which all share the same owner and administrators of the top level site collection.
a site collection controls global settings that sub-sites underneath it inherit. settings can include permissions, storage quotas, and themes, etc...
webs / sub-sites / spweb : these are web sites that live underneath a site collection. these are almost the same thing as a site collection but the difference is the global settings that are applied from the site collection.
webs can have their own independent settings separate from its parent site collection, but it makes it a bit easier to manage for the owner of the site, that's the idea here.
lists : a list is a generic term used to define the different places to store content in a sharepoint site. some built in lists are document libraries (upload and share word docs), picture libraries (upload pics), and custom lists where you define what you want to store.
I think this writing has been big enough to be an introduction. This will surely be edited again after learning some more about SharePoint.
So,what is Microsoft SharePoint? This would be a very bad idea asking this question me rather googling it. Google wouldn't mind telling you about this though Microsoft is their biggest competitor. Anyway what idea I got is,this is a collection of tools and s/w. This is not a single s/w rather it's a platform. Now what they are aimed to do? This integrated system can provide content management, enterprise search, accelerate shared business processes blah blah blah...But to me, most importantly it provides developers a platform and tools they need for server administration, application extensibility, and interoperability. Being a Microsoft product it has a very good integration with .NET. So .Net developers might find it interesting to investigate.
Now there are few keywords one must know before going ahead. I will try to list some of them here(be sure that I have copied them all from internet,none of them is written by me :))
wss(windows sharepoint services) : this is a free product from microsoft (comes with windows server). it gives you all the basic functionality of sharepoint including document libraries, lists, even things like email integration.
moss(microsoft office sharepoint server) : this is an add-on to wss which gives some very cool additional features. some examples are excel services, infopath forms server, ecm (enterprise content management) and moss enterprise search. this is not free(Ooops :(:(:(...)
also you can't just install moss... moss is built on top of wss, so wss is a prerequisite.
web application / web app : also known as a virtual server (in sharepoint v2) and an web site / application pool (in iis), web apps allow for logical separation of sharepoint content. each web app runs under a different process on the iis web server.
two examples of different web apps are the central administrator site which runs on an arbitrary port number and then standard sharepoint sites which typically run on port 80. they both run under separate processes in iis.
site collection / top level site / parent site / spsite : a site collection is a web site that can contain sub-sites (aka webs), which all share the same owner and administrators of the top level site collection.
a site collection controls global settings that sub-sites underneath it inherit. settings can include permissions, storage quotas, and themes, etc...
webs / sub-sites / spweb : these are web sites that live underneath a site collection. these are almost the same thing as a site collection but the difference is the global settings that are applied from the site collection.
webs can have their own independent settings separate from its parent site collection, but it makes it a bit easier to manage for the owner of the site, that's the idea here.
lists : a list is a generic term used to define the different places to store content in a sharepoint site. some built in lists are document libraries (upload and share word docs), picture libraries (upload pics), and custom lists where you define what you want to store.
I think this writing has been big enough to be an introduction. This will surely be edited again after learning some more about SharePoint.
Thursday, October 8, 2009
What database does Google use?
I was wondering what database system does google use. Oracle or MySQL? These two are the names came into my mind then. But just after little googling I found something much more interesting.
Google actually does not use any of the database systems available at market. Sure they use Oracle and MySQl (modified versions) for some of their services but neither of those contributes to their Search Engine. They have developed a storage system for their search engine(really a google job!!!). This is called Big Table. Google has been using it since early 2005.
This is a distributed storage system for managing structured data that is designed to scale to a very large size: petabytes of data across thousands of commodity servers.
Bigtable is the basis of Google's search technology, as well as many other applications such Google Finance, Google Maps and Google Earth. These applications place very different demands on Bigtable, both in terms of data size (from URLs to web pages to satellite imagery) and latency requirements (from backend bulk processing to real-time data serving).
Bigtable was developed with very high speed, flexibility and extremely high scalability in mind. A Bigtable database can be petabytes in size and span thousands of distributed servers.
Google released it in May 2008 as part of Google App Engine. As is typical with Google offerings, Bigtable is free to use, and the service is described as "in beta," even though Google has been using Bigtable internally for more than three years.
So why not dig deeper to find more about this....let me know if any of you get lucky with something interesting.
Google actually does not use any of the database systems available at market. Sure they use Oracle and MySQl (modified versions) for some of their services but neither of those contributes to their Search Engine. They have developed a storage system for their search engine(really a google job!!!). This is called Big Table. Google has been using it since early 2005.
This is a distributed storage system for managing structured data that is designed to scale to a very large size: petabytes of data across thousands of commodity servers.
Bigtable is the basis of Google's search technology, as well as many other applications such Google Finance, Google Maps and Google Earth. These applications place very different demands on Bigtable, both in terms of data size (from URLs to web pages to satellite imagery) and latency requirements (from backend bulk processing to real-time data serving).
Bigtable was developed with very high speed, flexibility and extremely high scalability in mind. A Bigtable database can be petabytes in size and span thousands of distributed servers.
Google released it in May 2008 as part of Google App Engine. As is typical with Google offerings, Bigtable is free to use, and the service is described as "in beta," even though Google has been using Bigtable internally for more than three years.
So why not dig deeper to find more about this....let me know if any of you get lucky with something interesting.
Sunday, March 29, 2009
MySQL :: Compiling the skeleton engine
From MySQL-5.1 there is support for pluggable storage engine. Here we will learn how to compile and use a skeleton engine.
First you need to have MySQL installed in your system. For installing follow this link
Now get the latest version of the skeleton engine. You will get it here
http://hg.tangent.org/skeleton-mysql-engine?ca=tip;type=gz
Now Step 1 untar and uncompress the file.
Now cd to this directory. You will see there is no configure file. Step 2 to generate on do the following
[root@localhost skeleton-mysql-engine-0beed5ef2859]# sh config/bootstrap+ '[' -f /usr/bin/glibtoolize ']'
+ LIBTOOLIZE=libtoolize
+ aclocal
+ autoheader
+ libtoolize --automake --force
+ automake --add-missing --force
configure.in:5: installing `config/missing'
configure.in:5: installing `config/install-sh'
src/Makefile.am: installing `config/depcomp'
Makefile.am: installing `./INSTALL'
+ autoconf
Now Step 3 is to configure
[root@localhost skeleton-mysql-engine-0beed5ef2859]# ./configure --with-mysql=/root/Desktop/mysql-5.1.30/ --libdir=/usr/local/mysql-5.1.30/lib/mysql/
Here the --with-mysql should be pointed to a source tree for MySQL. The --libdir can be used to say which lib directory the plugin should be installed in once it is compiled.
Now Step 4 is to just make, make install.
[root@localhost skeleton-mysql-engine-0beed5ef2859]# make
[root@localhost skeleton-mysql-engine-0beed5ef2859]# make install
Now start mysql and connect to it. Then Step 5 is to load it.
mysql> INSTALL PLUGIN skeleton SONAME 'libskeleton_engine.so';
Query OK, 0 rows affected (0.01 sec)
You can see all the storage engines.
mysql> show plugins;
+------------+--------+----------------+-----------------------+---------+
| Name | Status | Type | Library | License |
+------------+--------+----------------+-----------------------+---------+
| binlog | ACTIVE | STORAGE ENGINE | NULL | GPL |
| CSV | ACTIVE | STORAGE ENGINE | NULL | GPL |
| MEMORY | ACTIVE | STORAGE ENGINE | NULL | GPL |
| MyISAM | ACTIVE | STORAGE ENGINE | NULL | GPL |
| MRG_MYISAM | ACTIVE | STORAGE ENGINE | NULL | GPL |
| SKELETON | ACTIVE | STORAGE ENGINE | libskeleton_engine.so | BSD |
+------------+--------+----------------+-----------------------+---------+
6 rows in set (0.00 sec)
See,you have loaded your first storage engine.
First you need to have MySQL installed in your system. For installing follow this link
Now get the latest version of the skeleton engine. You will get it here
http://hg.tangent.org/skeleton-mysql-engine?ca=tip;type=gz
Now Step 1 untar and uncompress the file.
Now cd to this directory. You will see there is no configure file. Step 2 to generate on do the following
[root@localhost skeleton-mysql-engine-0beed5ef2859]# sh config/bootstrap+ '[' -f /usr/bin/glibtoolize ']'
+ LIBTOOLIZE=libtoolize
+ aclocal
+ autoheader
+ libtoolize --automake --force
+ automake --add-missing --force
configure.in:5: installing `config/missing'
configure.in:5: installing `config/install-sh'
src/Makefile.am: installing `config/depcomp'
Makefile.am: installing `./INSTALL'
+ autoconf
Now Step 3 is to configure
[root@localhost skeleton-mysql-engine-0beed5ef2859]# ./configure --with-mysql=/root/Desktop/mysql-5.1.30/ --libdir=/usr/local/mysql-5.1.30/lib/mysql/
Here the --with-mysql should be pointed to a source tree for MySQL. The --libdir can be used to say which lib directory the plugin should be installed in once it is compiled.
Now Step 4 is to just make, make install.
[root@localhost skeleton-mysql-engine-0beed5ef2859]# make
[root@localhost skeleton-mysql-engine-0beed5ef2859]# make install
Now start mysql and connect to it. Then Step 5 is to load it.
mysql> INSTALL PLUGIN skeleton SONAME 'libskeleton_engine.so';
Query OK, 0 rows affected (0.01 sec)
You can see all the storage engines.
mysql> show plugins;
+------------+--------+----------------+-----------------------+---------+
| Name | Status | Type | Library | License |
+------------+--------+----------------+-----------------------+---------+
| binlog | ACTIVE | STORAGE ENGINE | NULL | GPL |
| CSV | ACTIVE | STORAGE ENGINE | NULL | GPL |
| MEMORY | ACTIVE | STORAGE ENGINE | NULL | GPL |
| MyISAM | ACTIVE | STORAGE ENGINE | NULL | GPL |
| MRG_MYISAM | ACTIVE | STORAGE ENGINE | NULL | GPL |
| SKELETON | ACTIVE | STORAGE ENGINE | libskeleton_engine.so | BSD |
+------------+--------+----------------+-----------------------+---------+
6 rows in set (0.00 sec)
See,you have loaded your first storage engine.
MySQL :: Uninstalling
Sometimes it becomes mor cumbersome to uninstall something rather installing. MySQL is no different.
If you install it from rpm then follow these commands to uninstall.
# rpm -qa | grep -i mysql
mysql-libs-5.0.45-4.fc8
php-mysql-5.2.4-3
# rpm -e php-mysql-5.2.4-3
# rpm -e mysql-libs-5.0.45-4.fc8
In case of an installation from source distrobution, you can unistall mysql by going to that extracted installion directory (the directory you used to build/install mysql) and type in the following.
shell> make -n uninstall
then type
shell> make distclean
Following this, go delete the directory that it was installed to (i.e. /usr/local/mysql )
Thats all to uninstall MySQL from your PC.
If you install it from rpm then follow these commands to uninstall.
# rpm -qa | grep -i mysql
mysql-libs-5.0.45-4.fc8
php-mysql-5.2.4-3
# rpm -e php-mysql-5.2.4-3
# rpm -e mysql-libs-5.0.45-4.fc8
In case of an installation from source distrobution, you can unistall mysql by going to that extracted installion directory (the directory you used to build/install mysql) and type in the following.
shell> make -n uninstall
then type
shell> make distclean
Following this, go delete the directory that it was installed to (i.e. /usr/local/mysql )
Thats all to uninstall MySQL from your PC.
MySQL :: Installing in Linux from source
What should be the Step 1 for installing MySQL from source. Easy,download the source from MySQL site. Here is the link MySQL Source
Here is a point, If you are going to work with storage engine download at least mysql-5.1 because older versions don't have pluggable storage engine support. In this example I am using mysql-5.1.30 in Fedora 8.
It may take a few minutes to download the source. By the time you get the source downloaded you can read the rest of the article or take a cup of tea or just keep starring at the monitor(that's what I do actually).
Now make sure that you are logged in as superuser(root). Now create an account mysql. Step 2
# groupadd mysql
# useradd -g mysql mysql
This account(mysql) will have access to manage databases.
Now unpack the downloaded file and cd to it. Step 3
# tar -xzf mysql-5.1.30.tar.gz
# cd mysql-5.1.30
Now configure, make, make install. I usually use the /usr/local/ directory to install mysql.
Step 4
# ./configure --prefix=/usr/local/mysql-5.1.30
# make
# make install
Now we have to create a configuration file. It offers several security and control options (here you can limit system resources to be used by MySQL server, set the default collation and character set etc.). No need to make a new configuration file,there are 4 in support-files/ directory. Here we will use my-small.cnf. Step 5
# cp support-files/my-small.cnf /etc/my.cnf
# chown root /etc/my.cnf
# chgrp root /etc/my.cnf
# chmod 644 /etc/my.cnf
Now open the file and add user = mysql below [mysqld]
Now we have to install the grant tables. Installing the grant tables is accomplished by running the mysql_install_db script. This creates the mysql database which will hold all database privileges, the test database which you can use to test MySQL, and also privilege entries for the user that run mysql_install_db and a root user (without any passwords).Step 6
# /usr/local/mysql-5.1.30/bin/mysql_install_db --user=mysql
The script will create /usr/local/mysql/var/ directory containing the necessary databases. This directory serves as a default storage for all databases you will create. Make sure it is writable by "mysql" system user!
Now we shall start the server. Step 7
# /usr/local/mysql-5.1.30/bin/mysqld_safe --user=mysql &
This will start the server. To check if really server is running you can check the processes or try checking the mysql version.
# ps -all|grep mysql
# /usr/local/mysql-5.1.30/bin/mysqladmin version
Now connect to mysql server. Step 8
# /usr/local/mysql-5.1.30/bin/mysql -u root
Now you can see that you are connected to mysql. To check all Hosts and users do,
mysql> SELECT Host, User FROM mysql.user;
Right now there is no password for root user,you can put a password for the root user.
mysql> SET PASSWORD FOR 'root'@'localhost' = PASSWORD('123456');
Query OK, 0 rows affected (0.00 sec)
To exit mysql write
mysql> quit
Now to stop the server,
# /usr/local/mysql-5.1.30/bin/mysqladmin -u root -p shutdown
Now to start it again,
# /usr/local/mysql-5.1.30/bin/mysqld_safe --user=mysql &
Now connect again,
# /usr/local/mysql-5.1.30/bin/mysql -u root -p
You will be now prompted for password and giving the password you are connected to mysql.
If everything is done properly than Congratulations, mysql installation from source is done in your PC.
Appendix:
One more thing, If you don't want to start MySQL server manually after each system reboot set up an automatic startup. Go back to the directory where you extracted the downloaded mysql tarball file. Enter
# cp support-files/mysql.server /etc/init.d/mysql
# chmod 755 /etc/init.d/mysql
# chkconfig --add mysql
# chkconfig --level 35 mysql on
Here is a point, If you are going to work with storage engine download at least mysql-5.1 because older versions don't have pluggable storage engine support. In this example I am using mysql-5.1.30 in Fedora 8.
It may take a few minutes to download the source. By the time you get the source downloaded you can read the rest of the article or take a cup of tea or just keep starring at the monitor(that's what I do actually).
Now make sure that you are logged in as superuser(root). Now create an account mysql. Step 2
# groupadd mysql
# useradd -g mysql mysql
This account(mysql) will have access to manage databases.
Now unpack the downloaded file and cd to it. Step 3
# tar -xzf mysql-5.1.30.tar.gz
# cd mysql-5.1.30
Now configure, make, make install. I usually use the /usr/local/ directory to install mysql.
Step 4
# ./configure --prefix=/usr/local/mysql-5.1.30
# make
# make install
Now we have to create a configuration file. It offers several security and control options (here you can limit system resources to be used by MySQL server, set the default collation and character set etc.). No need to make a new configuration file,there are 4 in support-files/ directory. Here we will use my-small.cnf. Step 5
# cp support-files/my-small.cnf /etc/my.cnf
# chown root /etc/my.cnf
# chgrp root /etc/my.cnf
# chmod 644 /etc/my.cnf
Now open the file and add user = mysql below [mysqld]
Now we have to install the grant tables. Installing the grant tables is accomplished by running the mysql_install_db script. This creates the mysql database which will hold all database privileges, the test database which you can use to test MySQL, and also privilege entries for the user that run mysql_install_db and a root user (without any passwords).Step 6
# /usr/local/mysql-5.1.30/bin/mysql_install_db --user=mysql
The script will create /usr/local/mysql/var/ directory containing the necessary databases. This directory serves as a default storage for all databases you will create. Make sure it is writable by "mysql" system user!
Now we shall start the server. Step 7
# /usr/local/mysql-5.1.30/bin/mysqld_safe --user=mysql &
This will start the server. To check if really server is running you can check the processes or try checking the mysql version.
# ps -all|grep mysql
# /usr/local/mysql-5.1.30/bin/mysqladmin version
Now connect to mysql server. Step 8
# /usr/local/mysql-5.1.30/bin/mysql -u root
Now you can see that you are connected to mysql. To check all Hosts and users do,
mysql> SELECT Host, User FROM mysql.user;
Right now there is no password for root user,you can put a password for the root user.
mysql> SET PASSWORD FOR 'root'@'localhost' = PASSWORD('123456');
Query OK, 0 rows affected (0.00 sec)
To exit mysql write
mysql> quit
Now to stop the server,
# /usr/local/mysql-5.1.30/bin/mysqladmin -u root -p shutdown
Now to start it again,
# /usr/local/mysql-5.1.30/bin/mysqld_safe --user=mysql &
Now connect again,
# /usr/local/mysql-5.1.30/bin/mysql -u root -p
You will be now prompted for password and giving the password you are connected to mysql.
If everything is done properly than Congratulations, mysql installation from source is done in your PC.
Appendix:
One more thing, If you don't want to start MySQL server manually after each system reboot set up an automatic startup. Go back to the directory where you extracted the downloaded mysql tarball file. Enter
# cp support-files/mysql.server /etc/init.d/mysql
# chmod 755 /etc/init.d/mysql
# chkconfig --add mysql
# chkconfig --level 35 mysql on
Subscribe to:
Posts (Atom)
